Blogger Widgets
Showing posts with label Black. Show all posts

Monster Hunter Buddies

1 Comments
My little brother's a big fan of the game Monster Hunter and he just loves playing it so much. He like goes into nirvana when he gets his hand on the PSP. Hahaha! ^^

So he asked me to make him a key chain sized Poogie in watermelon costume which he said he will attach on his PSP. Nerd turd! Hahaha! I love him. ^^ Okay no problem... I Just need the Ideal Sphere pattern by Emily Premise-Conclusion


(Click for Pattern)

As a umm... Semi-semi beginner, I advise you to always have this around, anytime, anywhere 'coz it's the most helpful thing when making amigurumis. It's the best pattern to make perfect heads or reference for making other shapes. Seriously awesome. ^^


POOGIE
Materials:
*Initially I used the #57 - Caterpillar and #54 - Lettuce yarn for the watermelon suit but it wasn't accurate to the actual Poogie. So instead of Caterpillar, use #100 - Raven with Lettuce. ^^
Monaco Yarn Shade #232 - Lemonade (1 skein)
Monaco Yarn Shade #31 - Flamingo (1 skein)
Monaco Yarn Shade #100 - Raven (1 skein)
Monaco Yarn Shade #54 -  Lettuce (1 skein)
Monaco Yarn Shade #21 - Rose (1 skein)
Monaco Yarn Shade #19 - Raincoat (1 skein)
Monaco Yarn Shade # 22 - Tiger (1 skein)
Crochet Hook - F5 (3.75 mm)
Black beads #02
Fiberfill stuffing

HEAD/BODY
(Rose)
Rnd 1: 6sc in mr (6)
Rnd 2: inc aound (12)
Rnd 3:  1sc, inc, [2sc-inc] 3x, 1sc (16)
Rnd 4: 3sc-inc (20)
Rnd 5: 4sc, inc, 10sc, inc, 4sc (22)
(Lettuce)
Rnd 6-7: Sc around (22)
(Raven)
Rnd 8: Sc around (22)
(Lettuce)
Rnd 9-10: Sc around (22)
(Raven)
 Rnd 11: Sc around (22)
(Lettuce)
Rnd 12: Sc around (22)
Rnd 13: 4sc, dec, 10sc, dec, 4sc (20)
Rnd 14: dec-3sc (20)
Rnd 15: 6sc, 2dec, 6sc (14)
Rnd 16: 5sc, 2dec, 3sc (10)
Rnd 17: 3sc, 2dec, 3sc (8)
Rnd 18: 3sc, 2inc, 3sc (10)
FO, weave in ends
*Apply pink blusher to tip of snout for emphasis
  
EARS (2x)
(Flamingo)
*1sc in between Rnd 12 and 13 (Make sure ears are at least 4st apart)
*10ch, sl in first/same sc
*weave yarn through gaps to create ear flap
FO, weave in ends

LEGS (4x)
(Flamingo)
Rnd 1: 4sc in mr (4)
FO, leave tail for sewing

TAIL
5ch
Row 1: sc on 2nd ch from hook, sc across (4)
* Fold horizontally and sl edges together
FO, leave tail for sewing

FLOWER ON TAIL
(Tiger)
Rnd 1: 4sc in mr (4)
(Raincoat)
*[4ch, sl into next sc] 4x 
FO, weave in ends
Sorry it already looks beaten up and a bit tattered, I wasn't able to take pictures when I made it. I'm really not the photographing kind. Hehehe  

After I finished Poogie, my little brother asked me again to make him a monster hunter key chain and this time of the cat, Melynx. Of course this was more of a challenge since it had more complicated parts, but being such a good sister, I gave it a shot anyway. So I made a prototype and yeah... That didn't go so well. It was a CAT-astrophe! Hahaha! Get it? CAT-astrophe? I mean... I... Never mind! -_- It was actually so bad that whenever I see it I could hear its tiny, meowy voice saying "Please... Kill me. Kill me now!". Yikes!  


Anyway, it took me more than six months to find the perfect pattern but thank goodness I did... A tiny cat key chain pattern by Pierrot Gosyo with a bonus pouch or cozy pattern for naked cellphones. How thoughtful. ^^

BLACK CAT CELLPHONE STRAP

(Click for Pattern)

Of course I tweaked it a bit to make it look like Melynx and I'd say I delivered. Couldn't be happier with the result... Except maybe I forgot to write it all down. Yup! I got too excited and went on a crocheting frenzy. It was already too late when I realized it. Humm-dumm... -_- Sigh! C'est la vie. Well, at least I took pictures. Hehehe! ^^

MELYNX
Materials:
Monaco Yarn Shade # 100 - Raven (2-3 skeins)
Monaco Yarn Shade #99 - Fossil (1-2 skeins)
Crochet Hook - F5 (3.75 mm)
Felt cloth:
          - White
          - Black
          - Green
          - Pink
Fiberfill stuffing
Melynx turned out bigger than the intended key chain size since I mistakenly used a bigger hook. I guess I didn't thoroughly read the instructions and materials needed. Tee-hee! ^^ My little brother still loved it nonetheless and just attached it to his bag since it's too big for the PSP. Nerd turd! Hahaha! ^^


Copyright: Poogie is an original pattern written by Duchess Gala with adaptation from Emily Premise-Conclusion's Ideal Sphere pattern. You may do whatever you want with the finished product but please do not sell or claim the pattern as your own. Also, do not post the pattern directly to your website. Just link it to this blog. ^^ 

TarePanda

For me, one of the top 5 cutest things in the world are the pandas. Adorable, black and white, giant bears... Damn! They're so fluffy I could- Ungh! ^^I seriously wouldn't mind suffocating to death in their crushing bear hugs. Hahaha! ^^ Look at those sweet, innocent, little eyes. Awww.... 
So for my next project I had to do a panda and I found the perfect pattern in TheHarley's deviant page. She posted a finished amigurumi of Tare Panda and linked a blog where you can find the pattern. Okay, the Good news is  not only can you download the pattern for a regular Tare Panda but you can also have the pattern for the tiny version. Awesome, yes? Not entirely... The bad news is the whole thing's in Japanese.

(Click for Pattern)
 

Total let down I know, but one thing I learned from my short experience is that amigurumis cannot and will not be created without persistence and patience. As in you need a ton loads of both. Hehehe! Also it doesn't hurt to ask for a little help... TheHarley was very nice to assist me on how to crochet the panda. ^^ 

Anyway, it took a while to translate but I finally did it. Those who know how to read Japanese amigurumi patterns, please correct my mistakes if you find any. I'd really appreciate it. ^^

For now, I'll only post the pattern for the regular Tare panda. I didn't like how the tiny version came out and had to go back to the drawing board to fix the kinks. No worries, will be posting soon. 

TARE PANDA
Materials:
Monaco Yarn Shade #100 - Raven (3-4 skeins)
Monaco Yarn Shade #1 - Snow (5-6 skeins)
Crochet Hook - F5 (3.75 mm)

Felt cloth:
           - Black
           - White
Fiberfill stuffing

*3sc1 = 3sc in 1st
*hdcinc = 2hdc in 1st
*3dc1 = 3dc in 1st

HEAD
(Snow)
14ch
Rnd 1: sc on 2nd ch from hook, 12sc, 3sc1, 12sc, inc (30)
Rnd 2: inc, 12sc, 3inc, 12sc, 2inc (36)
Rnd 3: inc, 13sc, [inc-1sc] 2x, inc, 13sc, [inc-1sc] 2x (42)
Rnd 4: 2sc, inc, 14sc, [inc-2sc] 2x, inc, 14sc, inc, 2sc, inc (48)
Rnd 5: sc around (48)
Rnd 6: inc, 15sc, [inc-3sc] 2x, inc, 15sc, 
[inc-3sc] 2x (54)
Rnd 7-8: sc around (54)
Rnd 9: 2sc, inc, 16sc, [inc-4sc] 2x, inc, 16sc, inc, 4sc, inc, 2sc (60)
Rnd 10 - 14: sc around (60)
Rnd 15: 4 sc, dec, 16sc, [dec-4sc] 2x, dec, 16sc, dec, 4sc, dec (54)
Rnd 16: 3sc, dec, 15sc, [dec-3sc] 2x, dec, 15sc, dec, 3sc, dec (48)
Rnd 17: 2sc, dec, 14sc, [dec-2 sc] 2x, dec, 14sc, dec, 2sc, dec (42)
Rnd 18: 1sc, dec, 13sc, [dec-1sc] 2x, dec, 13sc, dec, 1sc, dec (36)
Rnd 19: dec, 12sc, 3dec, 12sc, 2dec (30)
Rnd 20: dec, 11sc, 2dec, 11sc, dec (26)

*Stitch the gap closed
FO, weave in ends
*Cut out black and white felt for facial features


BODY
(Snow)
12ch
Rnd 1:
sc on 2nd ch from hook, 10sc, 3sc1, 10sc, inc (26)
Rnd 2: inc, 10sc, 3inc, 10sc, 2inc (32)
Rnd 3: inc, 1sc, 3hdc, 4dc, 3hdc, 1sc, inc, hdcinc, 3dc1, hdcinc, 12sc, hdcinc, 3dc1, hdcinc (42)
Rnd 4: 2hdc, hdcinc, 3hdc, 4dc, 3hdc, hdcinc, 2hdc, inc, 2sc, inc, 18sc, inc, 2sc, inc (48)
Rnd 5: inc-7sc (54)
Rnd 6-10: sc around (54)
Rnd 11: 7sc-dec (48)
Rnd 12-14: sc around (48)
Rnd 15: 6sc-dec (42)
Rnd 16-17: sc around (42)
Rnd 18: (
Snow) dec, 4sc, [dec-5sc] 2x, dec, 4sc, dec, 1sc, (Raven) 6sc, (Snow) dec, 5sc (36)
Rnd 19: (
Snow) 23sc, (Raven) 8sc, (Snow) 5sc (36)

(Raven)
Rnd 20: sc around (36)
Rnd 21: 4sc-dec (30)
Rnd 22: sc around (30)
FO, leave tail for sewing


EARS (2x)
(Raven)
Rnd 1: 6sc in mr (6)
Rnd 2: inc around (12)
Rnd 3-4: sc around (12)
FO, leave tail for sewing


ARMS (2x)
(Raven)
Rnd 1: 6sc in mr (6)
Rnd 2: inc-1sc (9)
Rnd 3: inc-2sc (12)
Rnd 4-7: sc around (12)
Rnd 8: 3sl, 6sc, 3sl (12)
FO, leave tail for sewing


LEGS (2x)
(Raven)
Rnd 1: 6sc in mr (6)
Rnd 2: inc-1sc (9)
Rnd 3: sc around (9)
Rnd 4: inc-2sc (12)
Rnd 5: sc around (12)
Rnd 6: inc-3sc (15)
Rnd 7: inc-4sc (18)
FO, leave tail for sewing


TAIL
(Raven)
Rnd 1: 6sc in mr (6)
Rnd 2: inc around (12)
Rnd 3: sc around (12)
FO, leave tail for sewing

I actually created the panda twice and the pictures I posted are the result of my second attempt. The first one was given to one of my bffs as a gift before she left for her mission in Davao. Too bad I wasn't able to take a pic. Anyway, She loved it and said it reminded her of me... Not exactly sure if that's a compliment but I'll take it. Pandas are after all one of the cutest things in the world. Hehehe! ^^


Disclaimer: Some of the images are not mine and can be searched online

Shercat and Hedgeson

After watching seasons 1 and 2 of BBC's Sherlock... I became quite the fan, following forums and fan sites. I couldn't get enough of the crime-solving duo.

So I decided to get in on the rave and do a fan art of my own. ^^


Okay, making human amigurumi versions of them was out of the question... Sorry, not enough experience. But I figured why not make something that represents them instead. That's when I had the brilliant idea of making a cat version of Sherlock Holmes and a hedgehog version of John Watson. 


For "Shercat" and "Hedgeson" I used the cat pattern made by Nicki Sandoval and ideal sphere pattern by Emily Premise-Conclusion.


(Click for Pattern)
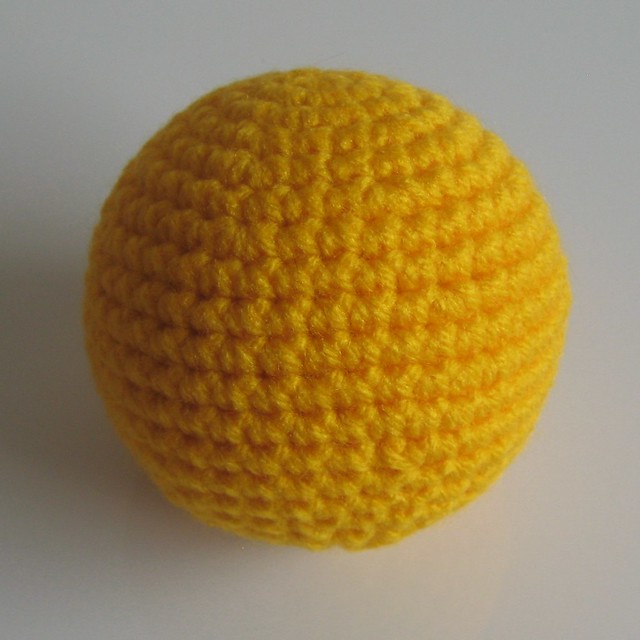
(Click for Pattern)

To be able to download these patterns, you must first register to Ravelry. It's free and has tons of free patterns to search from. Worth the time and effort to register.

SHERCAT
Materials:
Monaco Yarn Shade #43 - Admiral (1 skein)
Monaco Yarn Shade #100 - Raven (3-4 skeins)
Crochet Hook - F5 (3.75 mm)
White felt
White thread
Fiberfill stuffing
 I didn't anymore post my adjustments to the pattern to make Shercat since it's really not that much of a biggie, very minor tinkering. The scarf's also easy-peasy-lemon-squeezy, just do a few rows and make sure that scarf's length is long enough to be tied or stitched for it to look like Sherlock's actual famous blue scarf. Then add a row of tiny tassels at both ends for effect.

HEDGESON
Materials:
Monaco Yarn Shade #60 - Chiffon (4-5 skeins)
Monaco Yarn Shade #61 - Sand (4-5 skeins)
Monaco Yarn Shade #1 - Snow (1 skein)
Monaco Yarn Shade #12 - Blonde (1 skein)
Crochet Hook - F5 (3.75 mm)
Black felt
Fiberfill stuffing  

HEAD/BODY
(Chiffon)
Row 1: 6 sc in mr (6)
Row 2: inc around (12)
Row 3: 1sc-inc (18)
Row 4: 1sc, inc, 2sc, inc, 3sc, inc, 2sc, inc, 3sc, inc, 2sc (23)
Row 5: 2sc, inc, 3sc, inc, 4sc, inc, 3sc, inc, 4sc, inc, 2sc (28)
Row 6: 1sc, inc, 4sc, inc, 5sc, inc, 4sc, inc, 5sc, inc, 4sc (33)
Row 7: 3sc, inc, 5sc, inc, 6sc, inc, 5sc, inc, 6sc, inc, 3sc (38)
Row 8: 8sc, inc, 9sc, inc, 8sc, inc, 9sc, inc (42)
Row 9: 6sc, [inc-13] 2x, inc, 7sc (45)
Row 10: 9sc, [inc-14] 2x, inc, 5sc (48)
Row 11: 15sc, inc, 23sc, inc, 8sc (50)
Row 12: 24sc, inc, 25sc (51)
Row 13: inc, 50sc (52)
Row 14-20: sc around (52)
Row 21: 50sc, dec (51)
Row 22: 25sc, dec, 24sc (50)
Row 23: 8sc, dec, 23sc, dec, 15sc (48)
Row 24: 5sc, [dec-14] 2x, dec, 9sc (45)
Row 25: 7sc, [dec-13] 2x, dec, 6sc (42)
Row 26: dec, 9sc, dec, 8sc, dec, 9sc, dec, 8sc (38)
Row 27: 3sc, dec, 6sc, dec, 5sc, dec, 6sc, dec, 5sc, dec, 3sc (33)
Row 28: 4sc, dec, 5sc, dec, 4sc, dec, 5sc, dec, 4sc, dec, 1sc (28)
Row 29: 2sc, dec, 4sc, dec, 3sc, dec, 4sc, dec, 3sc, dec, 2sc (23)
Row 30: 2sc, dec, 3sc, dec, 2sc, dec, 3sc, dec, 2sc, dec, 1sc (18)
Row 31: dec-1sc (12)
Row 32: 4dec (3)
FO, weave in ends
*Cut out black felt for facial features
*Add a little mane around the face by attaching strands of Snow
*Using a steel brush, brush down the mane to make it furry

MUZZLE
(Chiffon)
Rnd 1: 6sc in mr (6)
Rnd 2: inc around (12)
Rnd 3: 1sc-inc (18)
Rnd 4: 2sc-inc (24)
Rnd 5: 3sc-inc (30)
FO, leave tail for sewing
*Use black embroidery floss to stitch nose and mouth

LEGS (x2)
(Chiffon)
Rnd 1: 6sc in mr (6)
Rnd 2: inc around (12)
Rnd 3: 1sc-inc (18)
Rnd 4-6: sc around (18)
Rnd 7: 1sc-dec (12)
Rnd 8: sc around (12)
FO, leave tail for sewing

ARMS (x2)
(Chiffon)
Rnd 1: 6sc in mr (6)
Rnd 2: inc around (12)
Rnd 3-8: sc around (12)
FO, leave tail for sewing

EARS (x2)
(Chiffon)
Rnd 1: 6sc in mr (6)
Rnd 2: inc around (12)
Rnd 3-4: sc around (12)
Rnd 5: 1sc-dec (8)
FO, leave tail for sewing

QUILLS
(Sand)
*5sc in every st all around the back
*Make sure to mark first where you want to put the quills to make it even
I don't have a pattern for the sweater. I just did some random rows for the body and sleeves and didn't keep track on the count. Really sorry! But you know, If I could come up with the sweater then it wouldn't be too hard for you to come up with it too. I even think you'd do a lot better. Hehehe ^^ I used Blonde.
So that's about it... My very own fan art of BBC's Sherlock. Pretty proud of myself actually. I wasn't 100% sure that I could do it and yet here they are... New additions to my amigurumi collection. So happy! ^^   


Copyright: Hedgeson is an original pattern written by Duchess Gala with adaptation from Emily Premise-Conclusion's Ideal Sphere pattern. You may do whatever you want with the finished product but please do not sell or claim the pattern as your own. Also, do not post the pattern directly to your website. Just link it to this blog. ^^  

Disclaimer: Some of the images are not mine and can be searched online
 

The Duchess' Hands Copyright © 2012 Design by Ipietoon Blogger Template